VisionGauge® OnLine version 12.73, dated October 26th, 2017, is available for download.
This update includes several new features:
– Users can specify multiple motorized axes that will retract to either the positive or negative limit switch before the 2D XY Stage Mapping correction is carried out upon startup of VisionGauge® Online. This is particularly useful for systems that may have parts mounted that could collide with the system during the initial homing of the X and Y axes.
To configure this feature, access the Motion Control Toolbox Settings menu and select “Startup”.
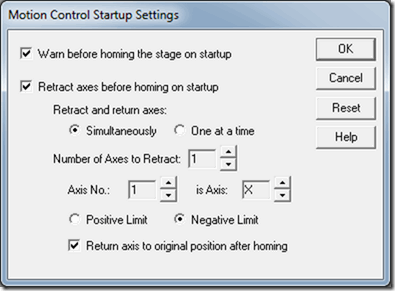
This window allows you to configure multiple axes that should retract before the X and Y axes begin homing. You can specify whether the axes all retract at the same time or if they retract one by one in the order specified. Each axis will retract to either its positive or negative limit. Users may also choose whether or not each axis returns to its original position after the X and Y axes have completed their homing. If you do choose to return axes to their original positions and the “One at a time” option was chosen for how to “Retract and return axes”, then the axes will return to their original positions in the reverse order that they were specified.
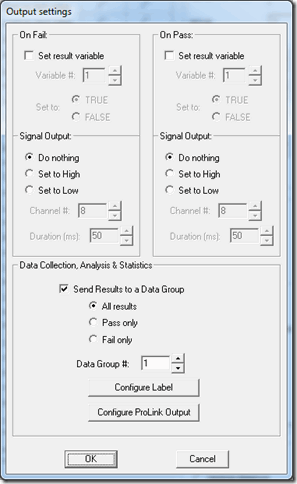
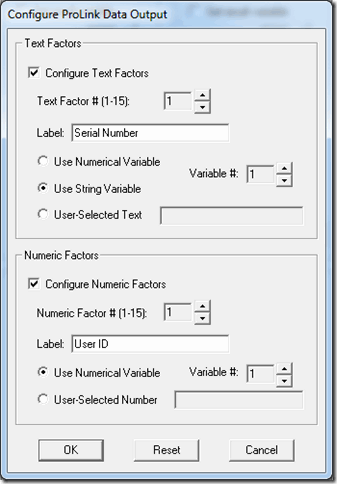
– Users may now also specify specific data that is sent to ProLink’s QC-Calc along with measurements and results. This data is configured through the usual “Output” setting on Program Toolbox steps, but users now have the option to configure QC-Calc text or numeric data. The data is in the format of 15 ‘Text Factors’ and 15 ‘Numeric Factors’. Users may configure these Factors to be populated by VisionGauge® OnLine Numerical and String variables or user-selected text or numbers. Users must include a label for those Factors that they want to send to QC-Calc. This allows easy storage of serial numbers, part numbers, user ids, or other relevant strings that might need to be stored with the measurement data in QC-Calc.
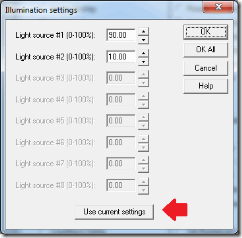
– In the Program Toolbox – Set Illumination step, we’ve added a button to set the illumination for this step to the current illumination settings. We’ve also delinked these illumination settings in the Program Toolbox from the main Illumination settings of VisionGauge® OnLine: Making changes to the Program Toolbox Illumination settings will no longer change your current illumination settings for the software. Users can still adjust the illumination from the main Illumination dialog on the live image. This will make setting up illumination in a program more efficient.
– Also, for users of Windows 10 and VisionGauge® OnLine, we’ve corrected an issue where the size of the menu fonts may cause the Overlay Toolbox and Measurement Toolbox to display improperly.